WinRT XAML Validation library: UI Controls for Validation

After you’ve defined the validation logic for your entities and performed validation automatically or manually, you want to show the aggregated validation messages on the UI. Unfortunately WinRT/XAML doesn’t come with such a functionality out of the box and solutions like Prism for Windows Runtime don’t add much value here as well.

WinRT XAML Validation library to the rescue: it comes with two handy UI controls ValidationPanel and ValidationSummary that give you a generic and easy-to-use approach to show validation messages to the user.

ValidationPanel

The ValidationPanel control can be used to show validation information for a single property of your data model entity. It can be wrapped around any XAML control (e.g. a TextBox) and has the following abilities:

  • Show a red/yellow border around the control to represent Errors/Warnings.
  • Show all validation messages for a property at the bottom of the control (optionally).

The usage of the ValidationPanel is quite simple. In XAML, just wrap it around a normal UI control and bind the ValidationMessages collection with the corresponding entity property as key to the control’s ValidationSource property:

<Page x:Class="WinRTXAMLValidation.Demo.MainPage" ...
      xmlns:vc="using:WinRTXAMLValidation.Library.Controls">
    ...
    <TextBlock Text="Your bid" />
    <vc:ValidationPanel ValidationSource="{Binding Bid.ValidationMessages[NewBid]}">
        <TextBox Text="{Binding Bid.NewBid, Mode=TwoWay}" />
    </vc:ValidationPanel>
</Page>

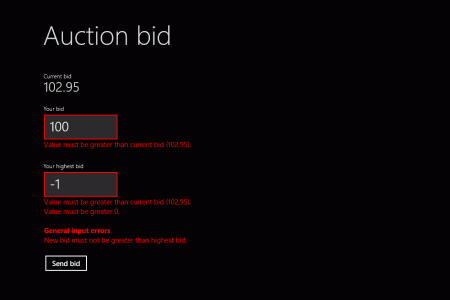
Here’s a sample output of two ValidationPanel controls, showing warnings and errors for the wrapped user inputs:

There are several properties on ValidationPanel that define its behavior:

  • ValidationSource: Bind any ReadOnlyCollection<ValidationMessage> to this property and the control will display the corresponding validation messages (Errors/Warnings). Normally binds to ValidationBindableBase.ValidationMessages[<PropertyName>].
  • ShowValidationMessages (default: true): Indicates whether the validation message texts will be shown on the control. Otherwise, only a red/orange border will be drawn on error/warning validation messages.
  • ShowPropertyValidationMessages (default: true): Indicates whether simple validation messages for a property (identified by ValidationMessage.ValidationMessageKind.Property) will be shown as text at the control.
  • ShowGroupValidationMessages (default: true): Indicates whether property-group validation messages (identified by ValidationMessage.ValidationMessageKind.Overall) will be shown as text at the control. This can come in handy if you don’t want to use the ValidationPanel for validation messages that span several properties, but show them in the aggregating ValidationSummary instead.

If you’ve used manual validation with a fake entity that stores the validation messages for you, you can bind the fake entity to ValidationPanel and your data model entity to the wrapped control as before:

<vc:ValidationPanel ValidationSource="{Binding BidValidation.ValidationMessages[NewBid]}">
    <TextBox Text="{Binding Bid.NewBid, Mode=TwoWay}" />
</vc:ValidationPanel>


ValidationSummary

The second control of the WinRT XAML Validation library is the ValidationSummary. While the ValidationPanel can be used to show validation messages for a single property, the ValidationSummary is there to show all aggregated validation messages of an entity.

Usage of the ValidationSummary is very easy. Just bind its ValidationSource property to ValidationBindableBase.ValidationMessages.AllMessages, if your entity derives from ValidationBindableBase. Moreover, you can use any ReadOnlyDictionary<string, ReadOnlyCollection<ValidationMessage>> of validation messages for the properties of an entity and bind it to the control. Here’s a simple code example:

<Page x:Class="WinRTXAMLValidation.Demo.MainPage" ...
      xmlns:vc="using:WinRTXAMLValidation.Library.Controls">
    ...
    <vc:ValidationSummary ValidationSource="{Binding Bid.ValidationMessages.AllMessages}" Header="General input errors" />
</Page>

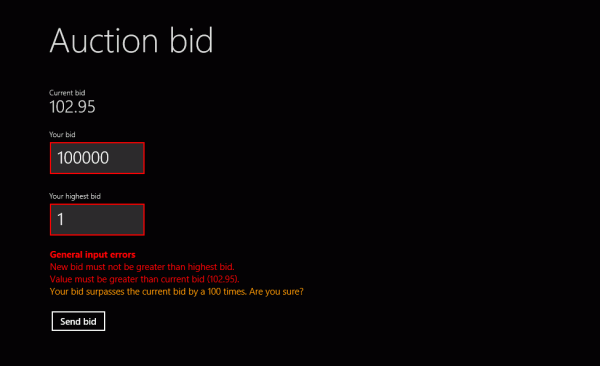
The following picture shows a sample output of the ValidationSummary for a validated entity, including errors and warnings.

There are several properties of the control that can be used to define its behavior:

  • ValidationSource: Dictionary of validation messages that should be shown in the summary. Normally binds to ValidationBindableBase.ValidationMessages.AllMessages.
  • ShowPropertyValidationMessages (default: true): Indicates whether validation messages for single properties should be shown in the summary or not.
  • ShowGroupValidationMessages (default: true): Indicates whether validation messages for property groups should be shown in the summary or not. This can come in handy, if you want to show this information only in ValidationPanel, but not in the ValidationSummary.
  • AffectedPropertyNames: Collection of property names, whose validation messages should be shown in the summary. If no value is given, the validation messages for all properties will be shown.
  • Header: Header text to be shown above the summary. If no value is given, no header will be shown.
  • ShowHeader (default: true): Indicates whether a header will be shown above the summary or not.


WinRT XAML Validation library: Manual Validation

Defining validation logic using Data Annotations is the default and recommended way in the WinRT XAML Validation library. But of course there are good reasons that you don’t want to use this approach. For example, you want to have all the validation logic for an entity at a central place or you don’t want your entities to implement ValidationBindableBase or you even don’t have access to the data model entities.

In this case you have the possibility to bypass the validation attributes and the ValidationBindableBase base class for your model entities. You get the flexibility to perform validation for yourself and add validation messages to the storage dictionaries.

Implement ValidationBindableBase

What you need is some entity that implements ValidationBindableBase and thus acts as store for the validation messages. Normally, this would be your „real“ model entity, but you’re able to define a fake entity as well. The only purpose of this entity is to store the validation messages through ValidationBindableBase, so this information can be bound to the UI. In the following example you can see a fake entity AuctionBidValidation that stores the validation messages for the original data model entity AuctionBid. The advantage: you don’t have to change your data model entity to derive from ValidationBindableBase:

public class AuctionBid
{
    public double CurrentBid { get; set; }
    public double NewBid { get; set; }
    public double? MaxNewBid { get; set; }
}

public class AuctionBidValidation : ValidationBindableBase { }

public class MainViewModel : BindableBase
{
    public AuctionBid Bid { get; private set; }
    public AuctionBidValidation BidValidation { get; private set; }
}

The view model contains the „real“ data model entity as well as the validation storage for the entity. Now both properties are exposed and can be bound to the UI. An upcoming blog post will show you how this happens.

Manually add validation messages

After you’ve performed validation for yourself, you can add a new validation message using ValidationBindableBase.ValidationMessages.AddMessage(). There are two overloads of this method: with the first you can add a validation message to a property, with the second you add a validation message for the whole entity. The following code example shows manual validation and adding validation messages manually:

public async Task SendBidAsync(AuctionBid bid, AuctionBidValidation bidValidation)
{
    bidValidation.ValidationMessages.ClearMessages();

    if (bid.MaxNewBid.HasValue && bid.NewBid > bid.MaxNewBid)
    {
        bidValidation.ValidationMessages.AddMessage(
            () => bid.NewBid, ValidationLevel.Error,
            "New bid can not be higher than max new bid.");
    }

    if (bid.NewBid >= bid.CurrentBid * 100)
    {
        bidValidation.ValidationMessages.AddMessage(
            () => bid.NewBid, ValidationLevel.Warning,
            "Your bid surpasses the current bid by a 100 times.");
    }

    if (bid.NewBid <= await this.GetCurrentBidAsync(bid))
    {
        bidValidation.ValidationMessages.AddMessage(
            ValidationLevel.Error, "Your bid has been surpassed.");
    }

    ...
}

Look how the original data model entity and the fake validation entity work together to get the validation information. The fake validation entity just stores the validation messages. The following screenshot shows how those validation messages will be shown on the UI:


Clearing old validation messages

Before you start a new validation, make sure to clear the old validation messages by using the ValidationBindableBase.ValidationMessages.ClearMessages() method as shown in the example above.


And a final hint: When you use manual validation and leave the validation attributes behind, you loose the ability of automatic implicit and explicit user input validation. You should be aware of this, when you decide which validation option is the best for you. Of course you can mix automatic and manual validation, performing manual validation only in critical situations like saving an entity.

WinRT XAML Validation library: Implicit and Explicit Validation Execution

Now that you have defined all your validation attributes on your model classes, you want to perform validation to detect if your entity is valid or not. Here you can go two ways with the WinRT XAML Validation library: implicit validation validates your entity automatically when properties change, while with explicit validation you call a function to perform the validation.

Validatable model classes

A prerequisite to perform validation on a model entity with the WinRT XAML Validation library is that your model class derives from the ValidationBindableBase class. This class stores all validation messages for you and is able to perform validation on your entity:

public class AuctionBid : ValidationBindableBase { ... }

Implicit Validation Execution

Implicit validation is triggered automatically when an entity property changes, thus the setter is called. Implicit validation is an opt-in mechanism, meaning that you have to activate this functionality first before your entity gets validated. Just set the IsImplicitValidationEnabled property on your model entity that derives from ValidationBindableBase to true:

var bid = new AuctionBid();
bid.IsImplicitValidationEnabled = true;

If you want to disable implicit validation execution temporarily, you are able to set IsImplicitValidationEnabled=false at any time. Finally for implicit validation to fire, you have to implement your model properties explicitly with a backing field. In the property’s setter, you’ve to call the SetProperty() method from the base class ValidationBindableBase, which performs the validation of the matching attributes for the property:

[ValidateAgainstMaxBid(ShowMessageOnProperty = false)]
public class AuctionBid : ValidationBindableBase
{
    private double newBid;

    [Range(0, double.MaxValue, ErrorMessage = "Value must be greater 0.")]
    [ValidateGreaterCurrentBid]
    public double NewBid
    {
        get { return this.newBid; }
        set { base.SetProperty(ref this.newBid, value); }
    }

    ...
}

Explicit Validation Execution

In many situations you don’t want to execute implicit validation everytime a property changes. For this case the WinRT XAML Validation library gives you the ability to execute validation explicitly by calling the ValidationBindableBase.ValidateAsync() method. Because ValidationBindableBase will be the base class for your model entities, that means calling the method on the entity itself:

var bid = new AuctionBid();
...
bool isValid = await bid.ValidateAsync();

The method returns true if the entity is valid and false otherwise. It’s async because of the async validation ability of attributes from the WinRT XAML Validation library.

WinRT XAML Validation library: Async Validation Attributes

Last posts have shown how basic validation attributes and property-group based validation attributes can be used to define custom validation logic, that goes beyond the default capabilities of Data Annotations. There’s another validation attribute base class in the WinRT XAML Validation library and that’s the AsyncValidationAttribute and its sister, the AsyncGroupValidationAttribute.

Both attributes define the abstract method IsValidAsync(), which you can use in your derived validation attribute classes to perform asynchronous operations during validation. The following code gives an example for the AsyncValidationAttribute class:

[AttributeUsage(AttributeTargets.Property, AllowMultiple = false, Inherited = true)]
public sealed class ValidateActualCurrentBidAttribute : AsyncValidationAttribute
{
    protected override async Task<ValidationResult> IsValidAsync(object value, ValidationContext validationContext)
    {
        var newBid = (double)value;
        var auctionBid = (AuctionBid)validationContext.ObjectInstance;
            
        var service = new AuctionService();
        var currentBid = await service.GetCurrentBidAsync(auctionBid);

        return (newBid > auctionBid.CurrentBid && newBid <= currentBid)
            ? new ValidationResult("Your bid has been surpassed.")
            : ValidationResult.Success;
    }
}

This sample async validation attribute calls the async service method AuctionService.GetCurrentBidAsync() to retrieve actual data from a server. It gets await’ed and returns the validation result after the async operations has returned. Thus you’re able to define custom validation logic in our asynchronous app world.

AsyncGroupValidationAttribute is a specialization of AsyncValidationAttribute, its usage doesn’t differ, so I will not show it here. The usage of an async validation attribute equals the usage of any other attribute on your entity and you’re able to use the functionality of the ExtendedValidationAttribute.

public class AuctionBid : ValidationBindableBase
{
    [ValidateActualCurrentBid(UseInImplicitValidation = false)]
    public double NewBid { ... }
}

WinRT XAML Validation library: Property-Group Validation Attributes

All predefined validation attributes in the System.ComponentModel.DataAnnotations namespace can be used to annotate a single property of an entity. So they cannot be used for validation that spans multiple properties.

For this case, the WinRT XAML Validation library comes with the GroupValidationAttribute base class. Its member CausativeProperties can be used to define properties, which cause the validation to run, when their values are changing. With the member AffectedProperties you can set properties, that will be marked invalid when the validation of a property from the CausativeProperties group fails.

The following code gives an example of a concrete validation class that extends the GroupValidationAttribute base class. CausativeProperties equals AffectedProperties, thus the group of properties that cause the validation equals the group of properties that are affected by the validation:

[AttributeUsage(AttributeTargets.Class, AllowMultiple = false, Inherited = true)]
public sealed class ValidateAgainstMaxBidAttribute : GroupValidationAttribute
{
    protected override IEnumerable<Expression<Func<object>>> AffectedProperties
    {
        get
        {
            AuctionBid entity = null;
            return new Expression>[]
                {
                    () => entity.NewBid,
                    () => entity.MaxNewBid
                };
        }
    }

    protected override IEnumerable<Expression<Func<object>>> CausativeProperties
    {
        get { return this.AffectedProperties; }
    }

    protected override ValidationResult IsValid(object value, ValidationContext validationContext)
    {
        var auctionBid = (AuctionBid)validationContext.ObjectInstance;

        return auctionBid.MaxNewBid.HasValue && auctionBid.NewBid > auctionBid.MaxNewBid.Value
            ? new ValidationResult("New bid must not be greater than highest bid.")
            : ValidationResult.Success;
    }
}

This group validation property can now be used to annotate the whole model entity on class level:

[ValidateAgainstMaxBid(ShowMessageOnProperty = false)]
public class AuctionBid : ValidationBindableBase
{
    public double CurrentBid { ... }
    public double NewBid { ... }
    public double? MaxNewBid { ... }
}

Additionally, the GroupValidationAttribute class derives from the ExtendedValidationAttribute class, so you’re able to use additional functionality brought by the ValidationLevel,  ShowMessageOnProperty and ShowMessageInSummary properties and others.

WinRT XAML Validation library: Basic Validation Attributes

Validation in the WinRT XAML Validation library is mainly based on .NET Data Annotations from the System.ComponentModel.DataAnnotations namespace. Here you can find several attributes, that you can attach to your entities and its properties. This annotates them with additional information/metadata, which’s evaluated elsewhere in your code or by the .NET framework.

WPF, Silverlight and e.g. ASP.NET MVC can evaluate those attributes automatically to display further information for an entity like a property label, etc.. And you can define validation logic with Data Annotations on your entity, which gets evaluated and presented to the user when the entity is validated.

ValidationAttribute

The WinRT XAML Validation library uses the Data Annotations approach as well to define validation logic on model entities. First you can use the already defined validation attributes from the System.ComponentModel.DataAnnotations namespace: RangeAttribute, RegularExpressionAttribute, RequiredAttribute, StringLengthAttribute, CustomValidationAttribute. All of those predefined attributes implement the ValidationAttribute base class. You can derive from this class as well to implement validation attributes with your encapsulated custom validation logic, for example:

[AttributeUsage(AttributeTargets.Property, AllowMultiple = false, Inherited = true)]
public sealed class ValidateGreaterCurrentBidAttribute : ValidationAttribute
{
    protected override ValidationResult IsValid(object value, ValidationContext validationContext)
    {
        var newBid = (double?)value;
        var auctionBid = (AuctionBid)validationContext.ObjectInstance;

        return newBid.HasValue && newBid.Value <= auctionBid.CurrentBid
            ? new ValidationResult("Value must be greater than current bid")
            : ValidationResult.Success;
    }
}

Now you can easily decorate your model entities with this attribute:

public class AuctionBid : ValidationBindableBase
{
    private double currentBid;
    private double newBid;
    private double? maxNewBid;

    public double CurrentBid
    {
        get { return this.currentBid; }
        set { this.SetProperty(ref this.currentBid, value); }
    }

    [Range(0, double.MaxValue, ErrorMessage = "Value must not be negative")]
    [ValidateGreaterCurrentBid]
    public double NewBid
    {
        get { return this.newBid; }
        set { this.SetProperty(ref this.newBid, value); }
    }

    [ValidateGreaterCurrentBid]
    public double? MaxNewBid
    {
        get { return this.maxNewBid; }
        set { this.SetProperty(ref this.maxNewBid, value); }
    }
}


ExtendedValidationAttribute

With the abstract ExtendedValidationAttribute class there’s another base validation attribute in the WinRT XAML Validation library that extends the functionality of the ValidationAttribute. Specifically with this base class you can:

  • define a level for the validation message (Warning or Error)
  • define if the validation message should be shown on the property and in the validation summary on the UI
  • define if the validation attribute should be considered in implicit validation (when a property changes)

For example, a validation level „Warning“ leads to the following output on the UI:

The definition on the entity property (taking a custom validation attribute ValidatePossibleMisentryBid as example) looks as follows:

[ValidatePossibleMisentryBid(ValidationLevel = ValidationLevel.Warning)]
public double NewBid { ... }

Like the ValidationAttribute you can use the ExtendedValidationAttribute as base class for your custom validation attributes.

WinRT XAML Validation library: Getting Started

This little blog posts describes how you can include the WinRT XAML Validation library in your project and get it to work.

Download

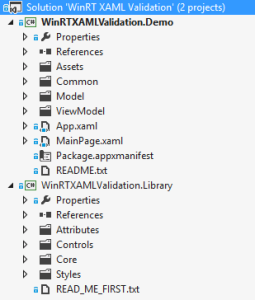
First go to the WinRT XAML Validation Codeplex project page and download the latest bits. The download package includes the sources of the library as well as a demo project (Windows Store App), which showcases many of the concepts and features of the library:


Usage by Source

To use the WinRT XAML Validation library, you have two possibilities. The first one is to include the library sources. To do this, copy the WinRTXAMLValidation.Library project to your app’s solution folder and add the existing WinRTXAMLValidation.Library.csproj project to your solution.
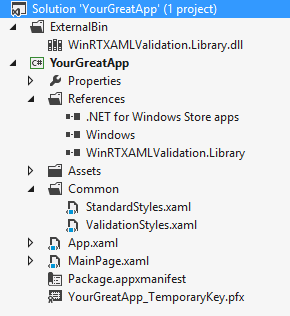
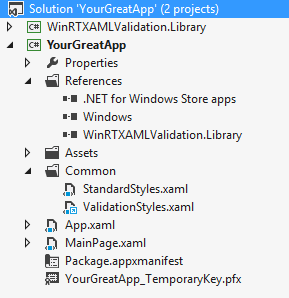
Add a reference to the library project everywhere you want to use the validation functionality. To get the UI control to work properly, you have to include the ValidationStyles.xaml file from the Styles folder of the library in your project. There are two different ways to do this:

  • Copy the ValidationStyles.xaml file to your Windows Store App project and reference it as ResourceDictionary in your App.xaml.
  • Add the ValidationStyles.xaml file as link in your Windows Store App project and reference it as ResourceDictionary in your App.xaml.

You’re free to choose from these approaches. Go the „copy way“ if you want to adapt the validation styles to your needs. Go the „add as link“ way if you simply want to use the UI controls as they are.

Usage by Assembly

If you don’t want to include the library’s sources to your solution, you can just add the compiled assembly as reference. To do this, first compile the WinRT XAML Validation library as Debug or Release. Copy the output assembly to your solution and reference it in every project where you want to use the validation functionality.
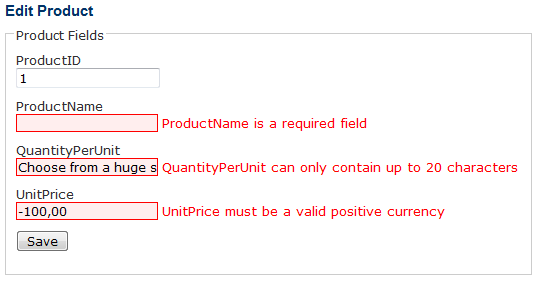
Copy the ValidationStyles.xaml file from the Styles folder of the library to your Windows Store App project and reference it as ResourceDictionary in your App.xaml.

Introducing the WinRT XAML Validation library

In this article I’m going to introduce „WinRT XAML Validation“, a library that brings consistent validation of user input to WinRT/C#/XAML apps. Upcoming blog posts will cover several aspects of the library in depth.

Prologue

I like WinRT. I like its approach of bringing common functionality to very different languages. But WinRT is not perfect. At least in „version 1“ (shipped with Windows 8 ) it has several shortcomings in various parts.

One of those shortcomings is user input validation in C#/XAML Windows Store Apps. Of course there are Data Annotations in .NET 4.5 for WinRT and the ValidationAttribute, also the INotifyDataErrorInfo interface is available. But what’s missing is the whole UI stuff. There are no UI controls or attributes on existing UI controls to show errors for validated properties. Hence at the moment you’re forced to execute validation manually and react accordingly to update the UI state.

„WinRT XAML Validation“ library

I’ve been unsatisfied with this lack of support for complete user input validation in WinRT/XAML. Thus a colleague and I developed a library, that fills the missing pieces and goes beyond trivial validation tasks. We needed comfortable and extended validation functionality for one of our development projects and now we want to make the resulting bits available as easy-to-use library.

WinRT XAML Validation has a project page on Codeplex and is free-to-use under the Ms-PL license.

>> Codeplex Project Page <<

Functionality Overview

The WinRT XAML Validation library is aimed to give developers a consistent, flexible and easy-to-use library to perform user input validation in WinRT/XAML apps. Developers should get a generic approach, that guides them through all steps of validating user input and performs the work for them.

With the WinRT XAML Validation library, you get a whole bunch of functionality, including:

  • Validation Attributes: Define custom validation logic with Data Annotations on your model entities. The library contains extended base attributes for validation with support of warnings/errors, async validation and validation logic, that spans more than one property.
  • Implicit Validation Execution: Use the ValidationBindableBase class on your model entities to perform validation. You can opt-in to let validation execute automatically when a entity property changes (implicit validation).
  • Explicit Validation Execution: Instead of running validation everytime a property changes on your model entities, you can call the ValidationBindableBase.ValidateAsync() method explicitly to validate the defined validation attributes.
  • Manual Validation: Besides the use of validation attributes to define validation logic, you can easily perform custom validation logic and add corresponding validation messages to a Dictionary, using the ValidationBindableBase.ValidationMessages.Add() method. The provided UI controls will update themselves automatically.
  • Validation UI Controls: There are two easy-to-use XAML UI controls to show validation messages. First there is the ValidationPanel control that wraps a control whose bound property should be validated (for example a TextBox). If validation fires for the property, the ValidationPanel will show a red border (orange for warnings) and optionally the validation message. More than one validation message is supported. The second control is the ValidationSummary, which can show aggregated validation messages for a whole form and its bound entity. Both controls update immediately when validation messages change, even in async scenarios.

Credits

I want to give credit to the Patterns and Practices group at Microsoft for developing and releasing the Prism for Windows Runtime library (f.k.a. Kona). It’s an awesome library that adds much value to the development of WinRT apps and I encourage you to check it out if you’re serious about Windows 8 business app development.

Basic ideas and concepts for the WinRT XAML Validation library are borrowed from Prism for WinRT. For example, the BindableValidator class has been taken over, but includes much more functionality now. While Prism for WinRT comes with some validation bits, WinRT XAML Validation comes with a more complete approach to user input validation.

Code Contracts #3: Contract checking

In my first two posts of this series, I covered some basic information about Code Contracts, their origins and core elements of DbC as well as the basic declarative nature of Code Contracts, the Contract Rewriter and why contracts are defined imperatively and not via attributation or additional keywords. In this blog post, I’ll dig even deeper to show the two main elements, how contracts on your code are checked…

The functionality of checking contracts/conditions on your code comes from two main components of Code Contracts: the dynamic checker (runtime checker) and the static checker. Those can be configured and activated after installation of the Code Contracts package through a new tab inside the project’s Properties window:

Configuring Code Contracts in the project's Properties windowMore information on that can be found e.g. on the Code Contracts User Manual.

The dynamic checker

The first component is the dynamic checker, which is even called runtime checker, what better implies its behavior. This type of contract checking is done at runtime of your program code. Everytime when the program execution hits a point, where contracts are defined, the Contracts runtime checks, if the contracts are fulfilled in the current context, that means with the current class state, current variable and parameter values etc. Thus the dynamic checker is searching for actual broken contracts in just the current context. Its behavior is very similar to a test (under the given context) resp. to a Debug.Assert(), leading to the term of validation of your code. If a contract check fails, then the default behavior is that a ContractException is thrown and the application terminates. This can be easily adopted to your own needs.

The static checker

So, dynamic checking ensures at runtime that no contracts are broken by current calls of your code. But it leads to the same problems as in unit testing: code coverage, choice of input/output pairs etc. Perhaps contract violations are not found during testing, because the checking with a chosen set of parameters fulfills those contracts. Problems occur, when you deliver your code and other developers use parameters that you didn’t consider and then contracts are not fulfilled any more.

The second and more interesting part of Code Contracts checking is the static checker. What’s the difference to dynamic checking? The static checker is able to check defined contracts at compile time of your code. Moreover, the static checker doesn’t only search for actual broken contracts, but for all possibilities where contracts could be broken by the defined code. For example, let’s imagine a method int Predecessor(int x), that returns the value x-1 and a post-condition on that method, that the return value is in every case ">= 0". With dynamic checking, perhaps you input some arguments for x: 1,5,100,13, … it would never lead to a situation, where the contract is broken. With static checking instead, the static checker would analyze the code at compile time and would recognize, that there are situations (every value for x < 1) where the post-condition of the method is not fulfilled. In this case, the static checker would output a warning to inform the developer of the possible contract breach.

With all this, the static checker is doing a formal verification of the defined contracts in contrast to the test-based validation of the dynamic checker. This is done by a complex algorithm that’s based on methods of formal logic and program verification and that’s why the static checker needs some time to perform the verification. The concrete algorithm is using abstract interpretation of the code, thus the code is being inspected, but not executed! By this process and with a basic rule-set on the CLR, facts about the code are generated and those facts are used to find out, if the code fulfills the defined contracts or not. The behavior of Code Contracts is very nice in comparison with the dynamic checking, but the complexity of this process may not be underestimated. Moreover, it’s heavily requiring contracts on most code pieces that you use in your contracted code, for example in the .NET framework. That’s why the Code Contracts team is currently working hard to introduce contracts all over the .NET libraries. Let’s do an example: if you have a string s and call s.Contains(), then you as programmer know that s.Contains() doesn’t change s or any other values. But if there would be no contracts on String.Contains(), then the static checker of Code Contracts could not know that Contains() is free of side effects and isn’t changing the value of s. Thus, it would warn on any post-condition of a method, that makes use of the value of s.

The following example shows a compiler warning, created by the static checker. The method WithDraw() for withdrawing money from an account has been understood and implemented as deposit (using the Deposit() method) with a negative amount. The static checker fails, because on deposit only positive values are allowed and that’s what the pre-condition on Deposit() declares. The warning is shown in the following picture. Furthermore you can see, that Code Contracts is suggesting a pre-condition on WithDraw(), by which the contract could be fulfilled.

Warning of the static checker at compile time

And that’s it again for the moment. In this blog post I’ve introduced the two core checking components of Code Contracts: the static checker and the dynamic checker. Where the dynamic checker is just doing a validation at runtime under the actual values context, the static checker is performing a complex formal verification at compile time, which finds all possible contract breaches. Those are two very different approaches and should be clear before using Code Contracts. Next blog posts will give you more examples on defining contracts and further insights.

kick it on DotNetKicks.com