I’m currently engaged in the development of a more or less complex data-driven WP7 application, which utilizes many features of the WP7 development platform. In a series of upcoming blog posts I want to share my experiences and tips&tricks with you.
In this blog post I will show you how to get started with the WP7 development: tools you need, VS2010 project templates you get and how to set up images and icons for your application.
Tools
The great news for .NET developers are: The main development platform for WP7 is Silverlight! Not the current Silverlight 4, but a modified version of Silverlight 3, which is enhanced with support for the camera, the phone sensors and with phone controls like the Panorama and the Pivot control. My experiences so far are that there are some shortcomings, you cannot use every feature of Silverlight 3 and you have to learn the principles and characteristics of the WP7 platform (like Tombstoning, controls, Application Bar, UI design, …). But in the whole if you are a Silverlight developer then the learning curve is not very steep and it’s seamless like with no other platform to develop WP7 apps. It’s a great experience and you’re very fast in implementing your ideas in compelling apps.
Here are the tools that I’ve installed and which I’m using for WP7 development:
- Visual Studio 2010: WP7 development is seamlessly integrated into the VS2010 IDE with all the development comfort (debugging, deploying, designer, Intellisense, …) you’re already comfortable with.
- Windows Phone 7 Developer Tools (DL, +Jan11 Update, +Fix): Those tools give you a Windows Phone emulator and integration into VS2010.
- Silverlight for Windows Phone Toolkit (DL): With the Toolkit you get dozens of new and modified components which you can use in your WP7 apps.
- Expression Blend 4: Especially in WP7 apps you have to bother with a nice UI design and Blend is the tool of choice to do that. It’s a very feature-rich design tool and yes: you need some time to incorporate with it. But the features and the outcome are more than worth it!
 WP7 Project Templates
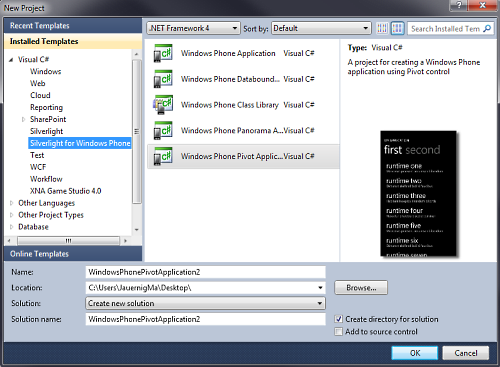
Starting a new WP7 project you have the choice between several „Silverlight for Windows Phone“ project templates in Visual Studio 2010 (if you have the WP7 tools installed):
- Windows Phone Application: A blank WP7 application.
- Windows Phone Databound Application: A WP7 application with some bound sample data (using the MVVM pattern).
- Windows Phone Class Library: This gives you a class library by which you’re able to structure your WP7 solution. Remember that the WP7 development platform is not .NET and not „default“ Silverlight 3, thus this new type of class library is needed. You’re able to add „normal“ Silverlight projects to your WP7 solution as well, but this will only work if you don’t use Silverlight features that exceed the capabilities of the WP7 platform.
- Windows Phone Panorama Application: Creates a project which uses the Panorama control to display bound sample data (using the MVVM pattern).
- Windows Phone Pivot Application: Creates a project which uses the Pivot control to display bound sample data (using the MVVM pattern).
For Panorama and Pivot Applications there is another blog post coming, which covers the characteristics and use cases of both controls.
WP7 Project Properties
Let’s create a blank WP7 project, for example a „Windows Phone Pivot Application“. On the properties pane of your WP7 project you get several configuration options, i.e. you can define the name of your application that is shown in the app list or tile on your WP7 device and the icon for your application in the app list or tile. Those settings are stored in the „Properties/WMAppManifest.xml“ file, which you can edit manually as well and which is needed when deploying your WP7 app.
There are several icons/images that you can configure and which affect the identification and appearance of your app. The following list shows the images/icons you should know by default:
- App List Icon:
- Background: Shows an icon for you application in the app list of your WP7 device.
- Requirements:
- Image type has to be PNG.
- Must reside in the root folder.
- Build type must be „Content“.
- Definition: Project Properties -> Application -> Deployment options -> Icon (or manually in the WMAppManifest.xml)
- Default Name: ApplicationIcon.png
- Size: 62 x 62 px
- Live Tile Icon:
- Background: Represents you app as a live tile on the homescreen.
- Requirements:
- Image type has to be PNG.
- Must reside in the root folder.
- Build type must be „Content“.
- Definition: Project Properties -> Application -> Tile options -> Background image (or manually in the WMAppManifest.xml)
- Default Name: Background.png (not very intuitive, is it?)
- Size: 173 x 173 px
- Splash Screen Image:
- Background: Shows a splash screen while your app is loading.
- Requirements:
- Image type has to be JPG.
- Must reside in the root folder.
- Build type must be „Content“.
- Definition: Name may not be changed, image is taken automatically when it exists.
- Default Name: SplashScreenImage.jpg
- Size: 480 x 800 px
- Panorama Background Image:
- Background: Defines the Background image of the Panorama control.
- Definition: Use the Panorama.Background property.
- Size (recommended): 1000 x 800 px – 2000 x 800 px
- Pivot Background Image:
- Background: Defines the Background image of the Pivot control.
- Definition: Use the Pivot.Background property.
- Size: 480 x 800 px
As you can see above in the „Requirements„, you don’t have every degree of freedom how to create and where to place your images/icons. This was frustrating to me, because I like to place such things in a separate subfolder of my project. Instead, they have to reside in the root folder, which I don’t like very much.
That’s it for the moment. As said, just some introductory information to get started with WP7 development.

